Shown below
is a distributed volume “DB_13_1_1” in consistency group “Cluster-2”.
1. Check consistency group as it should be cluster-2
for this volume
and Check
the Rule Set as it should be "Cluster-2-detaches"


2. Verify the
distributed volume is assigned to both cluster-1 and cluster-2 storage views as
the non-active side will be removed to rebuild the extended mirror:

3. ESX Visibility of Volumes before extending
cluster-2 host that
runs active database on cluster-2 DB_13:

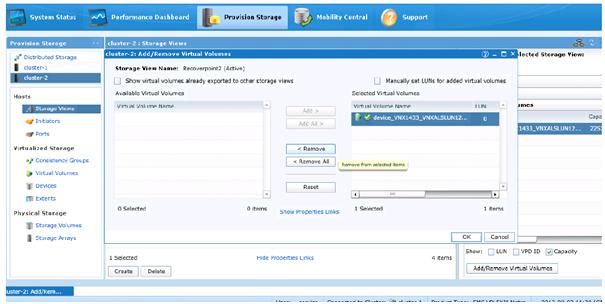
4. Remove cluster-2 DB13 from Cluster-2 consistency group:


5. Remove inactive volume (mirror with no I/O) from storage view not needed:


6. ssh into VPLEX and run vplexcli username/password again so you can break the mirror, removing the side that is inactive and that will be added back with a new larger size:
device detach-mirror --device DB_13_1_1 --mirror device_VNX_DB_13_1_1 --discard --force
device detach-mirror --device EU01_Exch_DB_13_1 --mirror device_VNX_DB_13_1_1
--discard --force
|
7. Refresh list of
Distributed Devices and confirm the removed side of the mirror is gone

8. Click on Cluster-1 devices and delete the device that's been removed from the mirror

9. Click on Cluster-1 extend and delete the extent that's been removed from the mirror

10. on Cluster-1 click on Storage Volumes, highlight the claimed volume that's been removed from mirror and click on "Unclaim"

11. collapse the live volume that's serving I/O to get it ready to give it a new larger mirror:
VPlexcli:/clusters/cluster-1/devices>
device collapse --device DB_13_1 _1
drill-down
device device_ VNX_DB_13_1_1
|
12. Type the set visibility local command
to change the visibility of the device to local and then validate the change
with another ll.
set visibility local DB_13_1
cd
/clusters/cluster-2/devices/device-VNX_DB_13_1_1
ll |

13. Expand active/live (non-mirrored) volume in GUI

Remember the storage
that's being added into the live volume to make it a raid-c cluster needs to
have a physical volume but not a virtual volume or extent or device.
14. Add Capacity from Virtual Volume in Cluster-2 choosing the new 50 Gb IWB_ExchDB13_EXT device
15. Confirm whether needed to rescan hosts at Cluster-2 as DB13 on vSphere

16. Expand the datastore to use the new space in as added to the lun from vSphere
17. Create a Virtual Distributed Volume with the newly extended 300+50 Gb Cluster-2-DB_13 volume and the new 350 Gb Cluster-1DB_13_1_EXT
18. Confirm Consistency Group (Cluster2) is as should be
when done
19. Add volume back
into Storage View (Cluster-1)
20. Rescan hosts in Cluster-1
and Cluster-2 vCenter as needed.