Monday, 9 September 2013

Quick & Dirty: Replacing NetApp Disk

This doesn't include steps for a MetroCluster, I'll add that later if I do that
1.      Verify failed disk
SnapVault> vol status -f shows failed disks
  also, 
  SnapVault> disk show 0a.02.03
 Shows failed disk  
    where 02 is the shelf , see LED number on front, left (shelf 1 is top, 2 is middle, 3 is bottom)
    where 03 is bay (see printed numbers associated with each disk location)

The disk is amber instead of green and the shelf indicates a fault as well.  To make the disk blink to be sure it's the correct one, run

SnapVault> priv set advanced
SnapVault*> blink on 0a.02.03
SnapVault*> blink off 0a.02.03

2.       Now you need to physically replace disk
3.       Assign the newly replaced disk so it becomes a hotspare:
SnapVault> disk assign 0a.02.03

4.  Verify all is well
SnapVault> disk show 0a.02.03
    to verify it's assigned as spare
SnapVault> vol status -f shows failed disks
 Note: OnCommand GUI can do some of this too under "Storage", "Disks"

Monday, 2 September 2013

deleting backups from Networker

Deleting records from Networker is easy enough, but you have to use the CLI:

(For me it's always helpful to start DOS with a "Run as Admin" option)

Then you "just" delete each backup, by SSID, from the Networker server like this:

1.  (NetworkerDos)# nsrmm -d -y -S 123456789

In human, that's something like "networker meadiamanagement command delete, answer yes to any prompts (like, are you sure?) and the SSID is 123456789

But you have to find the SSIDs of the backup jobs you want to delete first.
And, of course, be careful as you don't want to delete the wrong backups!

My process was to list all backup records (SSIDs) more than 8 months old:
(NetworkerDos)# mminfo -q "savetime<01/01/2013" > c:\temp\delete-2012\ssids-2012-only.txt

In human, that's something like, "give me info from the media mgt database where records are before January 1st 2013.  

The < (less than sign) logic isn't really intuitive or obvious at all, so see this post to understand it.

You can add the backup clients as well with:
(NetworkerDos)# mminfo -q "client=client.domain.org,client=client2.domain.org,savetime<01/31/2013" > c:\temp\delete-2012\ssids-2012-clients-list-1.txt


The way my backups retention is configured I had to get a list of all backup jobs for two sets of clients (those backed up weekly, then those backed up daily).  So I had to build two lists of these clients, and run the command twice, one for those backed up weekly and the other for the clients backed up daily:

Next is some user intensive bits that I couldn't automate as nicely as I'd have liked to.  I had lists of every backup job with the usual information including the SSID.  But I needed to remove from the list the backups I didn't want to delete.  And those were the all but the first backup of every Friday of the month (for weekly backups).  For the daily backups I wanted to keep all the Friday backups.

I needed Linux or Cygwin to manipulate these files as I still haven't learned powershell.

So I looked at a calendar of 2012 and made a list of the backups with the dates that I wanted to keep.  For example, I saw that May 4th 2012 was one of the dates that I didn't want to delete from my backups.  So I grep'ed all the backups from that date out of my delete-ssid.cmd script file:

$ grep -v "04/05/2012" ssids-2012-weekly-delete-list-removed.txt > ssids-2012-weekly-4-May-removed.txt


And after doing this for all the dates I wanted to keep, I did some spot-checking  before building a dos batch file to do the nsrmm -d command on all the reccords I wanted to remove.


It took my dedicated (physical) IBM X3650  2x2.39 GHz, 32 GB RAM Windows 2008 R2 Networker server  about 10 hours to remove some 12000 records.

2.  Then you run nsrim -X (I guess a Networker database check).  This took less than an hour, if memory serves...

3.  Finally, you're ready to run the Data Domain "clean".  You can do it from the CLI but it's works fine from the GUI too.  It's a 12 step process with most of the steps being building a list, step 11 being copying, and the last step seems to be doing some checks.  This step took up to 12 hours to run.

References:

cygwin echo with a tab separators: $ echo -e "test \t\tabcdetest"

http://nsrd.moab.be/
nsrvalley.com 
Data Domain Overview of Cleaning Phases, Document ID:1071


Friday, 2 August 2013

Collecting vBlock Logs--the MotherLoad

 Before testing preparations:

 MDS switches:

 # clear counters interface all
# debug system internal clear-counters all
   Cleared counters for module 1
# terminal length 0
# show hardware internal packet-flow dropped
`show hardware internal packet-flow dropped`

        Module: 01      Dropped Packets: NO

#

 ESXi: 

  #  date ; esxtop -b -a -d 5 -n 2000 | gzip -9c > /tmp/VH1-create-lun-i-o-esxtopoutput.csv.gz ; date

EMCget (from Windows)

VNX:

start NAR file collection


VPLEX:

VPLEXcli: collect-diagnostics
writes to /daigs/collect-diagnostics-out

After testing:

MDS switches:

set logging in putty for everything
 # terminal length 0
 # show tech-support details


UCS Cisco chassis/blades

log into UCS web-interface and select Admin tab near top left and right click "All" under filter anc Create and Download TechSupport Files in the main pane under "Actions".  Then select uscm, etc. and the location where you want the logs stored so you can copy them and upload them for analysis.

http://www.cisco.com/c/en/us/support/docs/servers-unified-computing/ucs-manager/115023-visg-tsfiles-00.html

EMCgrab (from Windows):

dos# emcgrab -h vmhostnaem -user username -password passw0rd

files are placed in install directory of EMCgrab, i.e..   

d:\ESXiGrab-1.3.1\EMC-ESXi-GRAB-1.3.1\outputs\


VNX:

stop and collect NAR files
generate and gather SP-Collects

VPLEX:

VPLEXcli: collect-diagnostics
writes to /daigs/collect-diagnostics-out

Thursday, 27 June 2013

Extending VPLEX Virtual Distributed Volume online

If you've paid enough for a VPLEX then you probably don't want an outage to extend a virtual distributed volume.  It's not quick and it's a bit fiddly, but here's how I did it (with help from some great folks at EMC).

Shown below is a distributed volume “DB_13_1_1” in consistency group “Cluster-2”.

1.  Check consistency group as it should be cluster-2 for this volume
and Check the Rule Set as it should be "Cluster-2-detaches"


 2.  Verify the distributed volume is assigned to both cluster-1 and cluster-2 storage views as the non-active side will be removed to rebuild the extended mirror:


Cluster-1 DB13:


3.  ESX Visibility of Volumes before extending
cluster-2  host that runs active database on cluster-2 DB_13:


4.  Remove cluster-2 DB13 from Cluster-2 consistency group:


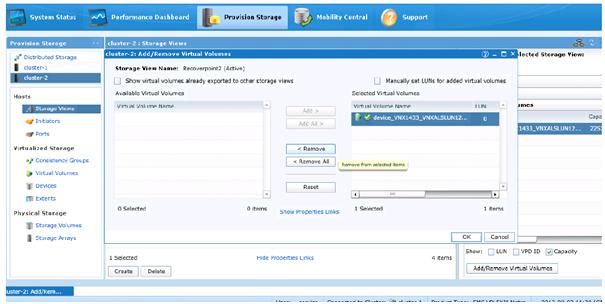
5.  Remove inactive volume (mirror with no I/O) from storage view not needed:


6.  ssh into VPLEX and run vplexcli username/password again so you can break the mirror, removing the side that is inactive and that will be added back with a new larger size:
device detach-mirror --device DB_13_1_1 --mirror device_VNX_DB_13_1_1 --discard --force

device detach-mirror --device EU01_Exch_DB_13_1 --mirror device_VNX_DB_13_1_1  --discard --force


7.  Refresh list of Distributed Devices and confirm the removed side of the mirror is gone


8.  Click on Cluster-1 devices and delete the device that's been removed from the mirror


9.  Click on Cluster-1 extend and delete the extent that's been removed from the mirror


10.  on Cluster-1 click on Storage Volumes, highlight the claimed volume that's been removed from mirror and click on "Unclaim"


11. collapse the live volume that's serving I/O to get it ready to give it a new larger mirror:


VPlexcli:/clusters/cluster-1/devices> device collapse --device DB_13_1 _1

drill-down device device_ VNX_DB_13_1_1


12.  Type the set visibility local command to change the visibility of the device to local and then validate the change with another ll.
set visibility local DB_13_1

cd  /clusters/cluster-2/devices/device-VNX_DB_13_1_1 
ll


13.  Expand active/live (non-mirrored) volume in GUI


Remember the storage that's being added into the live volume to make it a raid-c cluster needs to have a physical volume but not a virtual volume or extent or device.

14.  Add Capacity from Virtual Volume in Cluster-2 choosing the new 50 Gb IWB_ExchDB13_EXT device

15.  Confirm whether needed to rescan hosts at Cluster-2 as DB13 on vSphere


16.  Expand the datastore to use the new space in as added to the lun from vSphere
17.  Create a Virtual Distributed Volume with the newly extended 300+50 Gb Cluster-2-DB_13 volume and the new 350 Gb Cluster-1DB_13_1_EXT
18.  Confirm  Consistency Group (Cluster2) is as should be when done
19.  Add volume back into Storage View (Cluster-1)
20.  Rescan hosts in Cluster-1 and Cluster-2  vCenter as needed.

Friday, 22 March 2013

esxtop, batch mode & perfmon

VMware article KB article 1008205esxtop "Bible" from VMware

Create .esxrctoprc file for either VM disk collection or Disk collection mode.

Initiate the batch mode esxtop collection from the CLI on the ESXi host:
~ # date ; esxtop -c /.esxtopdisk-rc -b -d 5 -n 8640|gzip -9c >/vmfs/volumes/lun/esxihost-disk.csv.gz ; date

Then run the collection again using the other .esxtoprc file.

Counters are explained in terms that don't map directly from ESX docs and Windows Perfmon:

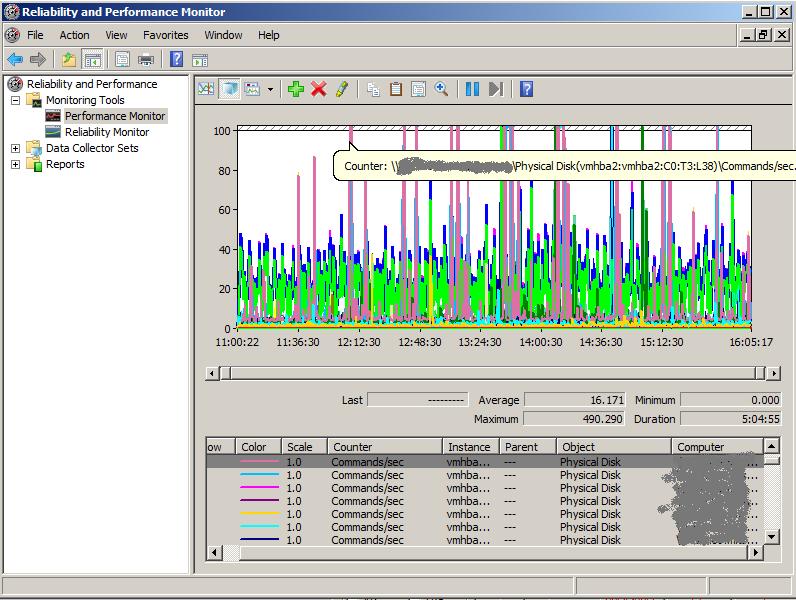
Copy the esxtop CSV file, unzip it and open it from Windows Perfmon by clicking on Monitor window and Properties, Source tab and Data Source Logfile (browse and select your .CSV file here).  Then go to Data Source and Add to select fields. I chose:

Physical Disk > Commands/sec
Physical Disk > Average Guest Milisec/Command
Physical Disk SCSI Device > Commands/sec


Disk Collection Stats Displayed in Perfmon:


Wednesday, 12 December 2012

ovftools, VMware Converter & downgrade ESX5 OVF to ESX4

Logged a call with VMware and they came back saying we couldn't downgrade an OVF of ESX5 to run on out ESXi4 vSphere environment.  Of course I didn't get their response until the next day.  And by then I had it working.  I'm sure they'd say this solution isn't supported, but it works for me.  As it's making copies of the original OVF files, I can't see any harm in giving it a try:

1.  Download & install ovftool then run:

#ovftool virtual-appliance.ovf virtual-appliance.vmx  (to inflate the vmx, vmdk, etc.)


2.  Download and install VMware Converter Standalone (I grabbed the latest version as of this post, which is 5.0.1 build-875114).

(choose the advanced install option)


That's it.  This version of the VM Hardware is 7, which is ideal for our ESX4 environment.  Job Done.

In the process of researching this, I saw how powerful ovftool is, but couldn't get it working with these OVA files as some folks.

Wednesday, 20 June 2012

Another BIOS setting for IBM X Series ESX Host

I keep getting these errors:


0x806F050CErrorMemory device X (DIMM XStatus) correctable ECC memory error logging limit reached [Note X = 1-12]


The suggestions above aren't all helpful as it takes a long time for these errors to occur, so moving the memory to another slot to confirm whether the problem is with the DIMM or slot is impractical.

A colleague helpfully remembered a problem on HP hosts that sounded similar. He got me looking and I found this BIOS/IMM setting:

Changing "Normal" mode to "Performance" mode affects the way that the DIMMS are refreshed.  This results in a DIMM temperature message occurring at a 10 degree lower temperature.

This article is not about my X3650, but IBM has verbally confirmed it applies to my server:


Change Thermal Mode setting (preferred method)
  1. Boot the blade into the F1 "System Configuration and Boot Management" screen. Highlight "System Settings." Press Enter and select Memory. Select Thermal Mode and change the setting to "Performance."
  2. Press the Esc key twice to get to "System Configuration and Boot Management" and then selectSave Settings and Exit Setup.
  3. Follow the instructions on the next screen to exit the "Setup Utility."
  4. Power the blade off for the changes to take effect and restart.
Changing "Normal" mode to "Performance" mode affects the way that the Dual In-Line Memory Modules (DIMMs) are refreshed. This results in a DIMM temperature warning message occurring at a 10 degree lower temperature. This causes no impact in most industry standard data centers.


Again, I don't have a blade but I seemed to have guessed correctly that they run the same code on the X Series.  Odd I haven't found much about this online.  It should be in a best practices document for IBM servers, maybe even a vSphere document.  Props to "VTSUkanov" for finding and posting about this on the VMware forums.


OSSV Pre-exec (and Post-exec scripts)

NetApp Management Console:
    Protection:
     Overview (select the Policy like OSSV that you copied from a template)
   Edit
     Nodes and Connections
       Primary Data tab
section:

Backup Script

entries:
Path: c:\temp\ossv_vl112_test.bat
Run As: (left blank)

Oddly it runs this script twice, once before and once after.  Silly, they should have, like every other proper backup software, a field for "pre" and a field for "post".  Very unprofessional of NetApp to not document this better, me thinks.  Or Does it run four times?

My script echoed that the variable DP_BACKUP_STATUS is set to four different things, each of the four times the script gets ran from my DFM OSSV backup job:


DP_BACKUP_STATUS=DP_BEFORE_TRANSFERS
DP_BACKUP_STATUS=DP_AFTER_TRANSFERS
DP_BACKUP_STATUS=DP_AFTER_BACKUP_REGISTRATION
DP_BACKUP_STATUS=DP_BEFORE_PRIMARY_SNAPSHOTS

Maybe it's different when it's scheduled verses ran with "Protect Now"

New version of DFM must have changed variables as they used to expect:


DP_BACKUP_STATUS=DP_BEFORE_SNAPSHOTS


and the post will have

DP_BACKUP_STATUS=DP_AFTER_SNAPSHOTS


Ah, thanks to Marlon on the NetApp forums

c:\DFM_scripts\ssh_ossv_hostname_pre.sh (runs the ssh to quiesce database)

c:\DFM_scripts\

Still, I don't understand what this bit from the  OSSV FAQ:  is on about though:

Q: Does the pre/post scripting capability in DFM work with OSSV?
A: Yes, you can use the DFM pre/post script ability to run commands on the host prior
to, or following an OSSV transfer.  The scripts are installed on the DFM server using
a “zip” file.  The “zip” file must contain the script (in PERL), and a XML File named
package.xml.  The package.xml file must include packaging information (version, file
name…) and the privileges needed to run the script.  Once the “zip” file has been
created, it can be imported into DFM and ran either manually or via a schedule set in
DFM.

Limitations, Limitations, Limitations:

There's only one pre-exec, post-exec script field for each backup job, even though it makes sense to backup about 10 OSSV clients per job.  Plus the backup job only runs a script on the DFM server, and obviously the OSSV clients need their databases quiesced.  That means you need to setup ssh and an ssh-key relationship between the DFM server and the OSSV client and get the DFM script launch a script remotely on the OSSV client by way of ssh--whew!

I install Cygwin for the ssh, ssh-key and a cygwin shell script to kick off the Linux script on the OSSV client from the DFM script, by way of OSSV in DFM. Again, whew!

Another limitation is that the OSSV backup environment variables only seem to track which stage of the OSSV backup job initiated it.  Nothing I can find about the name of the backup job, the OSSV client currently being backed up, or anything else I can put in my scripts to differentiate.  What we need to avoid is the same script running on all clients, needlessly and repeatedly.

CygWin & Windows Not Playing Nicely

You might use PowerShell to avoid some of this, but does powershell do ssh?  I had loads of problems if I copied my Cygwin linux shell by using windows (drag/drop in Explorer or from DOS command) as it changes the file format line endings (carriage return/line feed).  Same with if a DOS batch file is edited by VI or copied from Cygwin shell.  Ouch!   This ate much of my time.  Don't let it get you.

Monday, 18 June 2012

I'm on slide 28 of 56 of the Networker Overview eLearning course

I'm on slide 28 of 56 of the Networker Overview eLearning course.  I had to take a break to avoid going crazy, so I thought I'd post my thoughts about this format and EMC's use of it.

When you login to the account with the credits for an eCourse which has been booked, the EMC site has a link under education for you to click on to get to the course.  Weirdly, when  I clicked on that it just took me back to the main page of the site again (but it seems I was logged in with a temporary system generated username, perhaps in a virtual session of some kind).  Then there was no pointer or tip or explanation but I guessed to navigate to the same area again.  This time it started "Saba" in my browser (I only tried FireFox) and gave me access to the course and accompanying PDF for me to download.

Ok, the content is worthwhile.  They have information here that is more detailed and exhaustive than what I can find on their forums. The info is slightly more user friendly than the manuals.

But they really missed an opportunity to make this great and the envy of the IT world of training courses!  Come on EMC you're big enough, you have enough money.  You should be able to make these eCourses shine and rock!

What Sux:
The voice actors hired to read out the text of the materials obviously don't know or care anything about the material they are reading about.  They sound like robots.  It's not quite as bad as text to speech programs where you get a robot voice reading our your word with no clue to the inflection or emphasis. But there isn't much more humanity here.

It's surprisingly like a bunch of power point slides with someone reading out the text. and waiting for you to click next so they can read out the next slide, and so on.  They actually say, "This module covers the topics on this slide.  Please take the time to familiarise yourself with the topics on this slide".  Man, that's cheating. 
I


What They Should Do

They should aim to make these as good as real courses with real instructors.  They should add some personal anecdotes to help get the concept across, add some humour or at least humanity!

They should have someone draw some diagrams on a whiteboard and let us see what he's drawing while hearing him explain it.  Again, aim for the best part of real instructor led courses and see how you can come as close as possible.

They should take some useful questions from the dozens and dozens of courses that have been held already, and interject them into the course.  Questions and answers.  See it as a way to review the material or explain it in a new way.  This takes thought and brains, but it's what would set apart anyone who did courses like this from rubbish like what I'm enduring right now.

VMware has surpassed their mother company EMC with their VMWorld presentations which are available online.  You can hear the presenter, a real human, someone with experience in the product and passion about their topic. While listening to them you can see the slides they're showing.  In a way it's lower tech as I've not see any animations, but the bits I've mentioned in this paragraph far surpass the differences between a flash animation in the EMC vCourses and simple powerpoint + audio used in VMWorld presentations.

Friday, 15 June 2012

Snapshots, Deduplication and QTrees

Having not been on a NetApp course yet, it makes it "fun" trying to understand how these three concepts work together:  Snapshots, Deduplicaiton and QTrees (not to mention Volumes and SnapVault)

So here's my notes and a place to write anything I might figure out.

https://kb.netapp.com/support/index?page=content&id=1010363

https://library.netapp.com/ecm/ecm_get_file/ECMM1278402 (PDF)

OSSV FAQ not as easy to find as I'd expect. It's got some good stuff like Windows System State backup (registry, AD, etc.) and excluding files/paths in OSSV Backups and:

Q: Anytime I restore even a single file, I have to perform a full baseline or
reinitialize of my primary file system?
A: No.  If you run a full D/R restore, you need to re-initialize.  If you drag/drop a file,
then it should behave reasonably. In that case, it's just as if the user
created/modified a file.  


Q: Is OSSV 2.2 able to adress backing up Operating Systems?
A: OSSV 2.2 can backup Windows 2000/2003 but not the Unix platoforms.


Q: How does OSSV actually transfer data from primary to secondary
system?
A: Data is moved via TCP/IP network using TCP port 10566. The communications
protocol is QSM (based on Qtree-SnapMirror). This is not to be confused with NDMP
protocol. NDMP is used by NDMP-based management applications (DFM) for
management and control of the SnapVault primary and secondary systems. The
NDMP TCP port is 10000.


So, how do snapshots keep straight the different hosts' data being SnapVaulted since the snapshots are at the volume level?  I different snapshot must be created for each host/qtree, but how many SnapVault relationships can exist on one volume at a time?

Just posted a question on the NetApp forums as I'm not having any luck creating OSSV relationships like the diagram above.

Wednesday, 13 June 2012

Troubleshooting Checklist

We can't guess which order will get to the solution quickest, but here's a stab at some things to remember:

1).  What does the error say (I can jump to conclusions and miss the clues right in front of my eyes)
      If it says the hostfile is missing an entry, then it might be.

2)   What has changed since things were working?  Look for the culprit to be that thing that was changed 5 minutes ago or last week before trying every single link in the chain. 

3)   Which component could have the root cause?  If other network connections are fine then it's not the entire network (but it might be one port or one module, one switch or one data center that owns the problem.

4)   Draw a picture.  It's all about isolating what is not wrong, when you rule out all but one thing, the one remaining thing is the culprit!  So draw a picture to make it clear the way the components connect and to see visually.  Remember #1 above, try to not make assumptions.  That's where we usually miss the cause of the problem--it hides within the sensible and understandable but incorrect assumptions!

5)  Two heads are better than one.  It might just be that explaining and drawing the problem to a colleague, which forces you to explain it simply, think clearly will lead you to the "Aha!" moment.  Or they might see something you've missed or get lucky where you're unlucky.

This can all be very frustrating.  Take a step back, try to not get angry.


People wouldn't like you when you get angry.

Thursday, 31 May 2012

Microsoft Crappy VSS

Mark Bellows on the EMC forums posted some good stuff about toubleshooting some bad backup software with this great list that happens to show how much M$ VSS sucks too:


VSS snapshot creation may fail after a LUN resynchronization on a computer that is running Windows 7 or Windows Server 2008 R2 - November 25, 2009
http://support.microsoft.com/kb/976099
Backup fails with VSS Event ID 12292 and 11 on Windows Server 2008 and Windows Server 2008 R2 - January 20, 2010
http://support.microsoft.com/kb/2009513
No VSS writers are listed when you run the “vssadmin list writers” command in Windows Server 2008 R2
http://support.microsoft.com/kb/2009550
http://support.microsoft.com/kb/2009533
Windows 2008 R2 64-bit backup failed
http://solutions.emc.com/emcsolutionview.asp?id=esg108377
System State backup using Windows Server Backup fails with error: System writer is not found in the backup
http://support.microsoft.com/kb/2009272
A VSS hardware snapshot database keeps growing with duplicated ...
(959476) - ... VSS) requestor instances with VSS hardware provider to delete snapshots in Windows Server 2008 ... Important Windows Vista and Windows Server 2008 hotfixes ...
http://support.microsoft.com/kb/959476
A snapshot may become corrupted when the Volume Shadow Copy ...
(975688) - Fixes a problem in Windows 7 and in Windows Server 2008 R2 in which a snapshot may become corrupted when the VSS snapshots providers takes more than 10 ...
http://support.microsoft.com/kb/975688
A virtual machine online backup fails in Windows Server 2008 R2 ...
This issue occurs because the Hyper-V Volume Shadow Copy Service (Hyper-V VSS ... Important Windows 7 hotfixes and Windows Server 2008 R2 hotfixes are included in ...
http://support.microsoft.com/kb/2521348
You cannot safely remove volumes after you perform a VSS backup ...
(2487341) - ... files after you perform a Volume Shadow Copy Service (VSS) backup operation in Windows Server 2008 SP2. ... Windows Vista hotfixes and Windows Server 2008 hotfixes ...
http://support.microsoft.com/kb/2487341

Also, please note that not all of these fixes come with Windows update and are used on a case by case situation.

Now, from the client side, one thing you can do is to check on the status of VSS from the command line using vssadmin.

Here are a couple of MS KB articles to get you started:

Vssadmin usage

Manage Volume Shadow Copy Service from the Vssadmin Command-Line

How to enable the Volume Shadow Copy service's debug tracing features in Microsoft Windows Server 2003 and Windows 2008

Oh - one other thing you do from both the server and the client (I would start with the client to see if it is showing any errors) is to render the daemon.raw file.

To do this, make a copy of the /nsr/logs/daemon.raw file - I typically rename the copy to be daemon_YYYYmonthnameDD.raw.

From the command line, navigate to the directory the copied daemon.raw file is in, then run:

nsr_render_log daemon_YYYYmonthnameDD.raw >daemon_YYmonthnameDD.log

ie. nsr_render_log daemon_2012Jan27.raw >daemon_2012Jan27.log

You can then open the file through windows explorer with note pad or word pad and read the contents.  It may take a little time to get to the portion you need, but know when the backup started will help.