Wednesday 16 October 2013

Migrating ESXi4 to ESXi5 and changing vDistSw port groups without downtime

Scope: 


To move VMs from ESXi4 to ESXi5 without downtime means you won't be updating VMware tools (evidently future versions won't require a reboot--they promise this is the last). You can migrate to VMFS5 or upgrade datastore in place, but that won't be covered here either.

We're moving from ESXi4 hosts and vDist Switch port groups to ESXi5 hosts with different vDist Switch labels (but the same VLANs).

The method is different for VMs running on VMFS.  VMs with RDMs can't VMotion, but ours are part of Microsoft Clusters so we only have a small outage while they service is failed over from one VM to another.

Prerequisites and Setup before starting:


We needed an extra ESXi4 hosts and an extra ESXi5 host which I call "migration hosts" (or stepping stone hosts).  That's just to get the vDist Switches changed without interrupting the VMs network connections.


First we needed to move the VMKernel and VMotion off the vDist Switch so the host is not dependent on it (as we'll be removing the vDistSwitch as this host is moved to vCenter5).

Make sure you have one or two spare uplinks, you might need to remove a few spares from the vDist Switch.  Move the VMkernel configuration from the vDistSwitch to a newly created local port group from vCenter: Host > Configuration > Networking > vSphere Distributed Switch > Manage Virtual Adapters and "Migrate" (do VMkernel first, then do VMotion after you've finished VMKernel--two separate steps). 


who said VMKernel was dead in ESXi?  (^;

ESXi4 migration host: needs local port groups created and assigned VLANs for all VMs being migrated with vMotion.  Local port groups do not need the same name, but they need the same VLAN IDs so the VMs traffic will flow.  I did this a text file with all my port group names and VLAN IDs and a script that ran these commands on my ESXI4 migration host.

____________________________________________________
cat vDistPortGroups-new-only.txt | while read LINES ; do
pgn=`echo ${LINES} | awk '{print $1}'`
vlanid=`echo ${LINES} | cut -c1-3`
#echo $vlanid is vlanid and $pgn is portgroup name
echo esxcfg-vswitch -A "${pgn}" vSwitch0
echo esxcfg-vswitch -v ${vlanid} -p "${pgn}" vSwitch0
done
____________________________________________________

The ESXi4 migration host needs to be configured with the vDistSwitch used by your VMs that will be migrated and these new local port groups you've created with the commands from the script above.  the ESXi4 migration host is your stepping stone from VMs on ESXi4 with vDistSw to VMs on ESXi4 with local port groups.

Run the same commands on your ESXi5 migration host to get it ready as it will be a stepping stone from ESXi4 on local port groups to ESXi5 with local port groups (it will also be the stepping stone form ESXi5 on local port groups to ESXi5 on vDistSw).

Migrating VMs

ESXi4 to ESXi4 migration host:

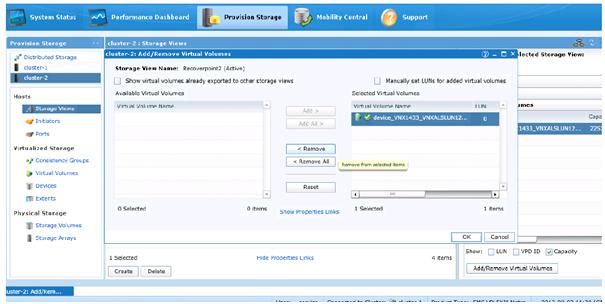
1.  vMotion VMs from ESXI4 host to ESXi4 migration host.

2.  Migrate VMs to local port groups with Wizard; go to the Networking section of vCenter and highlight the vDist Switch and right click on "Migrate Virtual Machine Networking" to start the wizard.  Select the vDistSwitch port groups and VMs on your host.  I have this all mapped out in a spreadsheet as it can be confusing and I don't want to miss any VMs or NICs.

3.  Remove the vDistSw from your ESXi4 migration host

4.  Disconnect your ESXi4 migration host from vCenter4

5.  Remove your ESXi4 host from vCenter4.  Warning says you will loose VMs and resource pool info, but it's info in vCenter, not info on the ESXi host (read carefully, it's accurate, worrying, but no risk to VMs that are running).  Of course at this point if you have a host failure you won't get any HA benefits because you've moved the host from the HA cluster by removing it from vCenter).

6.  On vCenter5 (completely different hosts and vCenter and Nexus1K VMs, etc.) add the ESXi4 migration host which is running your migrating VMs.

7.  As our Nexus1K vDistSw VEM code on our ESXi4 and ESXi5 hosts are incompatible, we need an ESXi5 migration how in this step.  It needs the same local port groups as ESXI4 migration hosts to be configured, and you just vMotion your VMs from ESXi4 migration host to ESXi5 migration host (controlled by vCenter5).  Now you have your migration VMs on an ESXi5 host but they're still running on local port groups.  As the ESXi5 migration host has both local port groups and the new ESXi5 vDistSw port groups, you can use the same Virtual Machine Network Migration Wizard to move the VMs to their final vDistSw port groups.

8.  Finally, migrate the VMs with a regular vMotion to the finally "puka" ESXi5 host with the good vDistSw port groups.  The only difference between this host and the previous one is that there are no local port groups on this host.

9.  disconnect your ESXI4 migration host from vCenter5, reconnect it to vCenter4, "lather, rinse & repeat"

My checklist also includes making sure the HA/DRS settings are all correct and updated as new VMs are migrated into vCenter5 and cleaning up the migration hosts.


Migrating Microsoft Cluster VMs involves shutting down the passive/inactive node/VM, recording then removing the RDM's (remove, do not remove and delete) from the VM configuration (.vnx).  Disconnect/remove from vCenter4 the host with the passive RDM VM, add to vCenter5.  migrate to ESXi5 host while powered down, change VLANs for vNICS, add RDM's back by adding existing disks and browsing and selecting them--ensuring same SCSI ID is assigned.  Power up VM, failover MS Cluster so you can "lather, rinse & repeat" same steps on the other node and you're done!  This method does mean short interruption of service as MS cluster is failed over.

good luck!

Monday 9 September 2013

Quick & Dirty: Replacing NetApp Disk

This doesn't include steps for a MetroCluster, I'll add that later if I do that
1.      Verify failed disk
SnapVault> vol status -f shows failed disks
  also, 
  SnapVault> disk show 0a.02.03
 Shows failed disk  
    where 02 is the shelf , see LED number on front, left (shelf 1 is top, 2 is middle, 3 is bottom)
    where 03 is bay (see printed numbers associated with each disk location)

The disk is amber instead of green and the shelf indicates a fault as well.  To make the disk blink to be sure it's the correct one, run

SnapVault> priv set advanced
SnapVault*> blink on 0a.02.03
SnapVault*> blink off 0a.02.03

2.       Now you need to physically replace disk
3.       Assign the newly replaced disk so it becomes a hotspare:
SnapVault> disk assign 0a.02.03

4.  Verify all is well
SnapVault> disk show 0a.02.03
    to verify it's assigned as spare
SnapVault> vol status -f shows failed disks
 Note: OnCommand GUI can do some of this too under "Storage", "Disks"

Monday 2 September 2013

deleting backups from Networker

Deleting records from Networker is easy enough, but you have to use the CLI:

(For me it's always helpful to start DOS with a "Run as Admin" option)

Then you "just" delete each backup, by SSID, from the Networker server like this:

1.  (NetworkerDos)# nsrmm -d -y -S 123456789

In human, that's something like "networker meadiamanagement command delete, answer yes to any prompts (like, are you sure?) and the SSID is 123456789

But you have to find the SSIDs of the backup jobs you want to delete first.
And, of course, be careful as you don't want to delete the wrong backups!

My process was to list all backup records (SSIDs) more than 8 months old:
(NetworkerDos)# mminfo -q "savetime<01/01/2013" > c:\temp\delete-2012\ssids-2012-only.txt

In human, that's something like, "give me info from the media mgt database where records are before January 1st 2013.  

The < (less than sign) logic isn't really intuitive or obvious at all, so see this post to understand it.

You can add the backup clients as well with:
(NetworkerDos)# mminfo -q "client=client.domain.org,client=client2.domain.org,savetime<01/31/2013" > c:\temp\delete-2012\ssids-2012-clients-list-1.txt


The way my backups retention is configured I had to get a list of all backup jobs for two sets of clients (those backed up weekly, then those backed up daily).  So I had to build two lists of these clients, and run the command twice, one for those backed up weekly and the other for the clients backed up daily:

Next is some user intensive bits that I couldn't automate as nicely as I'd have liked to.  I had lists of every backup job with the usual information including the SSID.  But I needed to remove from the list the backups I didn't want to delete.  And those were the all but the first backup of every Friday of the month (for weekly backups).  For the daily backups I wanted to keep all the Friday backups.

I needed Linux or Cygwin to manipulate these files as I still haven't learned powershell.

So I looked at a calendar of 2012 and made a list of the backups with the dates that I wanted to keep.  For example, I saw that May 4th 2012 was one of the dates that I didn't want to delete from my backups.  So I grep'ed all the backups from that date out of my delete-ssid.cmd script file:

$ grep -v "04/05/2012" ssids-2012-weekly-delete-list-removed.txt > ssids-2012-weekly-4-May-removed.txt


And after doing this for all the dates I wanted to keep, I did some spot-checking  before building a dos batch file to do the nsrmm -d command on all the reccords I wanted to remove.


It took my dedicated (physical) IBM X3650  2x2.39 GHz, 32 GB RAM Windows 2008 R2 Networker server  about 10 hours to remove some 12000 records.

2.  Then you run nsrim -X (I guess a Networker database check).  This took less than an hour, if memory serves...

3.  Finally, you're ready to run the Data Domain "clean".  You can do it from the CLI but it's works fine from the GUI too.  It's a 12 step process with most of the steps being building a list, step 11 being copying, and the last step seems to be doing some checks.  This step took up to 12 hours to run.

References:

cygwin echo with a tab separators: $ echo -e "test \t\tabcdetest"

http://nsrd.moab.be/
nsrvalley.com 
Data Domain Overview of Cleaning Phases, Document ID:1071


Friday 2 August 2013

Collecting vBlock Logs--the MotherLoad

 Before testing preparations:

 MDS switches:

 # clear counters interface all
# debug system internal clear-counters all
   Cleared counters for module 1
# terminal length 0
# show hardware internal packet-flow dropped
`show hardware internal packet-flow dropped`

        Module: 01      Dropped Packets: NO

#

 ESXi: 

  #  date ; esxtop -b -a -d 5 -n 2000 | gzip -9c > /tmp/VH1-create-lun-i-o-esxtopoutput.csv.gz ; date

EMCget (from Windows)

VNX:

start NAR file collection


VPLEX:

VPLEXcli: collect-diagnostics
writes to /daigs/collect-diagnostics-out

After testing:

MDS switches:

set logging in putty for everything
 # terminal length 0
 # show tech-support details


UCS Cisco chassis/blades

log into UCS web-interface and select Admin tab near top left and right click "All" under filter anc Create and Download TechSupport Files in the main pane under "Actions".  Then select uscm, etc. and the location where you want the logs stored so you can copy them and upload them for analysis.

http://www.cisco.com/c/en/us/support/docs/servers-unified-computing/ucs-manager/115023-visg-tsfiles-00.html

EMCgrab (from Windows):

dos# emcgrab -h vmhostnaem -user username -password passw0rd

files are placed in install directory of EMCgrab, i.e..   

d:\ESXiGrab-1.3.1\EMC-ESXi-GRAB-1.3.1\outputs\


VNX:

stop and collect NAR files
generate and gather SP-Collects

VPLEX:

VPLEXcli: collect-diagnostics
writes to /daigs/collect-diagnostics-out

Thursday 27 June 2013

Extending VPLEX Virtual Distributed Volume online

If you've paid enough for a VPLEX then you probably don't want an outage to extend a virtual distributed volume.  It's not quick and it's a bit fiddly, but here's how I did it (with help from some great folks at EMC).

Shown below is a distributed volume “DB_13_1_1” in consistency group “Cluster-2”.

1.  Check consistency group as it should be cluster-2 for this volume
and Check the Rule Set as it should be "Cluster-2-detaches"


 2.  Verify the distributed volume is assigned to both cluster-1 and cluster-2 storage views as the non-active side will be removed to rebuild the extended mirror:


Cluster-1 DB13:


3.  ESX Visibility of Volumes before extending
cluster-2  host that runs active database on cluster-2 DB_13:


4.  Remove cluster-2 DB13 from Cluster-2 consistency group:


5.  Remove inactive volume (mirror with no I/O) from storage view not needed:


6.  ssh into VPLEX and run vplexcli username/password again so you can break the mirror, removing the side that is inactive and that will be added back with a new larger size:
device detach-mirror --device DB_13_1_1 --mirror device_VNX_DB_13_1_1 --discard --force

device detach-mirror --device EU01_Exch_DB_13_1 --mirror device_VNX_DB_13_1_1  --discard --force


7.  Refresh list of Distributed Devices and confirm the removed side of the mirror is gone


8.  Click on Cluster-1 devices and delete the device that's been removed from the mirror


9.  Click on Cluster-1 extend and delete the extent that's been removed from the mirror


10.  on Cluster-1 click on Storage Volumes, highlight the claimed volume that's been removed from mirror and click on "Unclaim"


11. collapse the live volume that's serving I/O to get it ready to give it a new larger mirror:


VPlexcli:/clusters/cluster-1/devices> device collapse --device DB_13_1 _1

drill-down device device_ VNX_DB_13_1_1


12.  Type the set visibility local command to change the visibility of the device to local and then validate the change with another ll.
set visibility local DB_13_1

cd  /clusters/cluster-2/devices/device-VNX_DB_13_1_1 
ll


13.  Expand active/live (non-mirrored) volume in GUI


Remember the storage that's being added into the live volume to make it a raid-c cluster needs to have a physical volume but not a virtual volume or extent or device.

14.  Add Capacity from Virtual Volume in Cluster-2 choosing the new 50 Gb IWB_ExchDB13_EXT device

15.  Confirm whether needed to rescan hosts at Cluster-2 as DB13 on vSphere


16.  Expand the datastore to use the new space in as added to the lun from vSphere
17.  Create a Virtual Distributed Volume with the newly extended 300+50 Gb Cluster-2-DB_13 volume and the new 350 Gb Cluster-1DB_13_1_EXT
18.  Confirm  Consistency Group (Cluster2) is as should be when done
19.  Add volume back into Storage View (Cluster-1)
20.  Rescan hosts in Cluster-1 and Cluster-2  vCenter as needed.

Friday 22 March 2013

esxtop, batch mode & perfmon

VMware article KB article 1008205esxtop "Bible" from VMware

Create .esxrctoprc file for either VM disk collection or Disk collection mode.

Initiate the batch mode esxtop collection from the CLI on the ESXi host:
~ # date ; esxtop -c /.esxtopdisk-rc -b -d 5 -n 8640|gzip -9c >/vmfs/volumes/lun/esxihost-disk.csv.gz ; date

Then run the collection again using the other .esxtoprc file.

Counters are explained in terms that don't map directly from ESX docs and Windows Perfmon:

Copy the esxtop CSV file, unzip it and open it from Windows Perfmon by clicking on Monitor window and Properties, Source tab and Data Source Logfile (browse and select your .CSV file here).  Then go to Data Source and Add to select fields. I chose:

Physical Disk > Commands/sec
Physical Disk > Average Guest Milisec/Command
Physical Disk SCSI Device > Commands/sec


Disk Collection Stats Displayed in Perfmon: